Granting Access to QuickBooks Online

Thank you for considering Draughts & Ledgers, Ltd for your bookkeeping needs. In order to provide you with a proposal, I need to see your actual books as they currently exist. I’ve directed you to this page because you’ve indicated that you currently use QuickBooks Online. Follow these simple instructions to share your financial information with me!

https://www.loom.com/embed/b420b0d3ae104dfa99cd8d762e9a89c7

  • From your QuickBooks Online Dashboard, go to the Gear icon in the upper right.
  • Select Manage Users
  • Go to the Accountants tab
  • Enter qboa(the @ goes here)draughtsandledgers.com

That’s it! You’ve now shared your information with me in a secure way. You have the right as the account holder to revoke this access at any time. Any activity I do in your accounts is tracked & logged. At this stage, all I’m doing is taking a general survey of how things are and considering the work necessary to take them to where they need to be. Thank you for taking this step on getting your books in order and your financial life straightened out!

Your Audit and You

** DRAFT ***

It has finally happened. Buried in that stack of unopened mail you’re finally getting to is that letter from the Department of Revenue. Dread sours your stomach and anxiety quickens your breath. Shaking, you open it to find a Notice of Pending Audit [- is this correct name?]. The jig is up. The pooch, hiding under the porch. You’re about to be buried by the arduous task of proving that you are innocent, racking up huge accountant & legal advice bills in the process. You don’t have time for this. Your business doesn’t have the resources for this. You don’t want to deal with this. Why is this happening to you?

Good news! This is not about you. Take a nice, deep breath. The Department of Revenue is charged with conducting random audits. There is likely* no particular reason you received this notice other than your business was selected at random. Take another breath. Unless you are knowingly violating excise or meals tax laws, the worst that will happen is that the records will be corrected and the proper amounts accessed. You’ll learn a little about how to improve your recordkeeping, make arrangements to pay what was due, and off you go.

*If you ARE knowingly violating excise or meals tax laws, fess up early and work with the DoR now that you have seen the errors of your ways. Trying to deny, obfuscate, or obstruct will only make things worse for you. Your industry peers are playing by the rules; what makes you so special?

What the DoR wants

The Department of Revenue is only interested in seeing where your submitted numbers came from and that they are nice and accurate. They will assume that your original records are factual and that the summary you make available to them reflects these facts. They are generally looking at two things: Excise Tax & Meals/Sales Tax.

Excise Tax

For an Excise Tax audit, your auditor wants to understand 1) where the beer came from, 2) where the beer went, and 3) that all of the beer is accounted for. Where the beer came from is generally either in-house production or contract brew acquisition. Either way, your AB-1 is going to reflect the source and, more importantly, the tax-determined volume produced. Let’s show them your calculation:

DateGyle/InvoiceWort Produced (BBL)Wasteage (%)Packaging Date6x4x16oz cans1/6 BBL kegs1/2 BBL kegs10.6G FirkinTotal Volume Packaged (BBL)Total Volume Packaged (Gallons)
20APR2121PA1418.6
21APR2121PA1518.5
21APR2121PA1618.63.2210MAY21436301052.191618

On your AB-1, you probably put in something like this:

Date Rc’dInvoice#AcquiredNumber of BBL or casesNumber of litersNo tax paid (gal)MA tax paid (gal)
10MAY2121PA14-16Packaged gyles 21PA14-21PA1652.191618

Note that while you do not report your gyle volumes to the DoR, they like to see them on your internal summary sheet so that they can confirm that your wasteage percentage is reasonable. They are familiar with your industry and understand that a NE IPA will have higher wasteage than a British golden ale. What they’re looking for is that you aren’t “wasting” beer into clandestine packaging that’s falling off a truck at your back dock. They’ll work to confirm this by looking at your packaging and materials costs as seeing if they’re in line with industry averages. They’ll also be checking your AB-1 numbers against your quarterly federal BROP submissions.

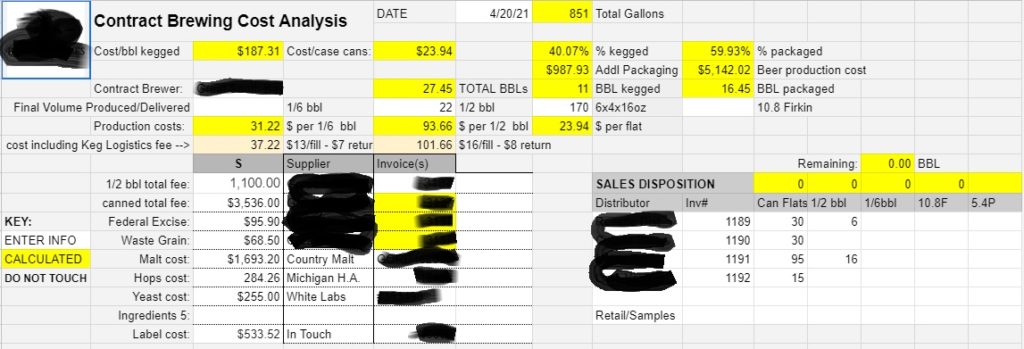
Once the DoR understands where your finished product is coming from, they’ll want to understand where it’s going. They’ll typically do this by choosing, from your excise tax filing, a couple of lines to investigate. What they’re trying to do here is link the sales invoices to the product packaged on a particular date. Here’s an example of a log sheet I use with one of my contract brew clients.

So clearly, all product was sold on these 4 invoices. With the invoice number and your sales log, they can now cross-reference the purchaser and see that yes, the product is accounted for in and out of your brewery. If you have on-site consumption or retail sale, you’ll need to record this movement from your production (brewery) space to retail (taproom). I find it useful to recorded on $0 internal sales invoices, which will not only account for volume moved but also record the conversion of production inventory to retail COGS. I also recommend using a sales invoice to record beer used for Promotional/Advertising purposes as this beer is tax-exempt [NEEDS CONFIRMATION]

This is easier with one-off batches or discrete purchases like my contract brewing client. This is much more difficult with continuous brands, large batches, and small accounts. Hopefully you’ve been practicing FIFO and can produce a reasonable estimate. It’s much better if you already have a mechanism to track batches because if you need to do a recall due to a contamination or some other reason, you want to be able to reach the retail vendors ASAP. If you’re using a production package such as ekos_, this is all done automatically for you as their software naturally tracks by the production lot. Canadian auditors find ekos_ to be sufficiently transparent in their standard, accounting-like internal structure that their excise audits consist of allowing the auditor direct access to the software. I find this to be a compelling reason to use such products.

Sales & Meals Tax Audits

While not the focus of an Excise audit, the subject of Sales & Meals taxes may come up. Unless there’s a compelling reason to turn it over to that auditing team, they just want to do a basic check that you are:

  • NOT charging Sales tax on packaged beer sold at retail. This is a tax-exempt sale. And, if you have mistaken this in the past, that you correct it for future transactions and that the amounts you collected are remitted to the Commonwealth.
  • ARE charging Meals tax (including the local option) on beer sold for on-premise consumption.

They probably won’t check but I’d just like to remind you that

  • Clothing (including hats) are EXEMPT from Sales tax
  • Glassware (including empty growlers) are SUBJECT to Sales tax
  • Growlers purchased & filled on-demand are subject to MEALS tax. While the off-premise consumption of beer beer is tax-exempt, the act of pouring on demand overrides this. Since the container is incidental and included in the price, it is also subject to Meals rather than Sales tax. [NEEDS CONFIRMATION]
  • Growlers filled and sealed for off-premise consumption are EXEMPT from Sales tax. It must be offered without modification before sale.
  • If you are selling packaged goods via self-distributing wholesale or retail via the taproom, you MUST be accounting for the $.05 deposit on each container. This goes both ways; if your customer returns the empty container to you for recycling, you must return (and account for) the $.05 deposit. If your customer is a Retailer, you are obligated to issue the additional handling fee of 2.25 cents per container. [What if the customer is a restaurant? Do they get the handling fee if they never collected/returned the nickel deposit?]

Holy Cats! New PPP Rules Really Help Sole-Proprietors

Holy Cats! New PPP Rules Really Help Sole-Proprietors
Photo by Jp Valery on Unsplash

Released in the first couple of days of March 2021, the updated Interim Final Rules from the December update to the CARES Act addresses a glaring flaw in the implementation of the CARES Act. This is that Sole-Proprietors were instructed to use Net Profit (Line 31 of the Schedule C) to do their calculation (Line31/12×2.5). As many small business owners know, that final ‘score’ for the year doesn’t always capture the economic benefit their business brings them. For someone with $12K here, this may not reflect the actual money-transferred-to-personal-accounts that made up your personal income. This is especially true if you’re on cash basis or in an asset-heavy business with a lot of depreciation expenses.

Let’s take that $12K net income. Under the old rules, this would be 12/12 x 2.5 = $2,500 of PPP. In my experience, many banks, especially national ones, just didn’t want to deal with the hassle of these micro-loans (their 5% Lender’s fee=$125 for processing your application and doing the loan paperwork). And, given the original requirements for onerous documentation (hope you have a good bookkeeper!), most sole proprietors took an understandable pass. Which is a shame because it was these small businesses that could have used the help the most!

Under the new rules, your calculation is instructed to consider your Gross Income instead (Line 7 of the Schedule C). Did your business generate more than $100K? You could qualify for the maximum $20,833 ($100K/12 x 2.5). This is certainly more worthwhile to pursue than the $2,500 in the example above.

Are you a contractor paid via 1099-MISC/NEC that doesn’t bother with the Schedule C? The 1099-MISC is sufficient documentation of your income for these purposes. You can probably apply based on it, whereas before it was a more difficult situation to navigate.

One thing to keep in mind is that PPP Loans CANNOT overlap any Unemployment you may have collected as a self-employed entrepreneur. For example, if you collected unemployment March-May and were able to resume business activities after that time, you should be able to specify that the PPP was retroactively for Aug-Oct. Or, for current use. Not quite sure on how the timing works out. But the takeaway here is separating the time periods.

Even if you HAVE been continuously collecting unemployment, worst case scenario is that you return the unemployment for the covered period. For example, if your unemployment was for $480/week, the 10 weeks of the 2.5 month period the PPP was active is worth $4,800. If you collected $20,833, you’re still retaining $16,033 after returning those payments to the issuing authority. You are supposed to report the PPP as income (max $2,083.30) for the weeks covered by the period. Again, this is still a developing situation but that is my understanding at this time.

I encourage you to approach your bank. Ask about the PPP application process. Cite the updated IFR. Get a piece of the aid made available to help people like you get through these challenging economic times.

A final word, *DO* expect to pay for assistance if you need it. In the original CARES Act, your assistance (Agent) was supposed to collect a small part of the bank’s Lender’s Fee and were expressly forbidden from charging you directly. The banks benefited from a previous IFR that allowed them to keep the full Lender’s Fee. A consequence of this is that Agents can now charge you directly for their services. Beware exorbitant fees and the scammers who will inevitably accompany this program. Work with someone you trust.

You also want to act fast. The PPP program ends on March 31, 2021.

Now a FreshBooks Partner!

Draughts & Ledgers, Ltd is proud to announce that we are now a Partner in the FreshBooks Accounting Professionals Program! It took a bit of extra training to get familiar with this neat online accounting alternative but for creatives and service entrepreneurs with modest accounting requirements, Freshbooks may just fit the bill. Designed around the all-important invoice, all of the workflow revolves around getting you paid and what you need to do to create the value you’re being paid for.

Providing a service? Direct & simple invoicing!

Selling a product? Freshbooks integrates with a variety of popular direct-selling websites in addition
with giving you the flexibility to bill your wholesale accounts directly.

👇👇 Start a **FREE TRIAL** by clicking the banner below! 👇👇

Already setup in FreshBooks? Check out this short video on how to add Draughts & Ledgers as an Admin/Accountant!

Work Better Together: Accountants and Clients

With FreshBooks, accountants get access to the tools, reports, and information needed to properly advise and work with clients. This includes:
  • Access to accounting reports like General Ledger, Balance Sheet, and Profit and Loss
  • Adding Journal Entries
  • Managing Chart of Accounts
  • Reviewing and managing Invoices, Expenses, Payments, Other Income, and Bank Reconciliation
  • And, when it comes to tax time it’s easy to fill out and file forms. You’ll also have access to the information needed to maximize deductions and get insights into business performance.

Add Authorized User to MassTaxConnect

If you’re asking your bookkeeper to keep an eye on your tax status in Massachusetts, it may be helpful to give them direct access to your data in the commonwealth’s tax filing system, MassTaxConnect. Rather than share your personal Master Administrator credentials (NEVER A GOOD IDEA), set them up with their own as an Authorized User. Not only can you control which and how much access they have, their activity is logged independently by the State, which is a great deterrent of nefarious intent.

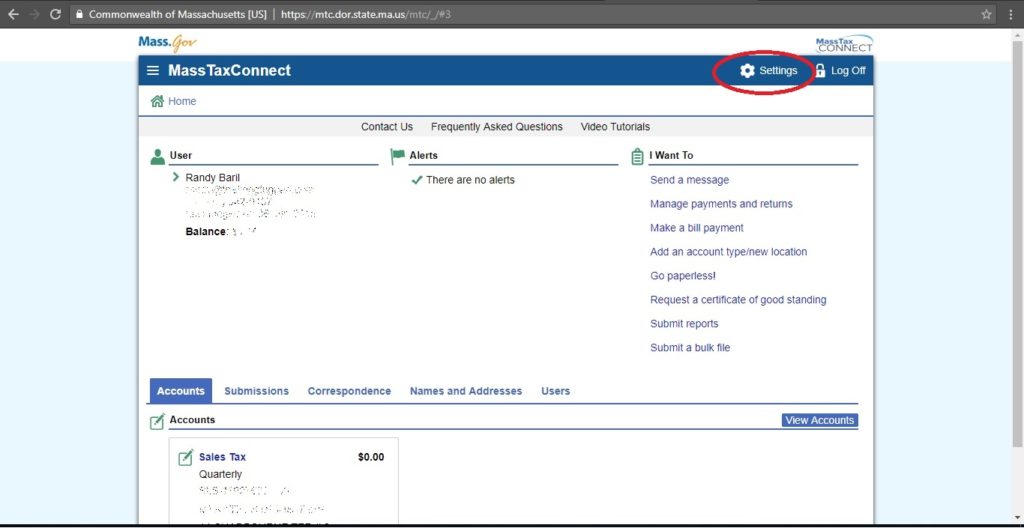
  1. From your Home screen, click on Settings in the upper right.

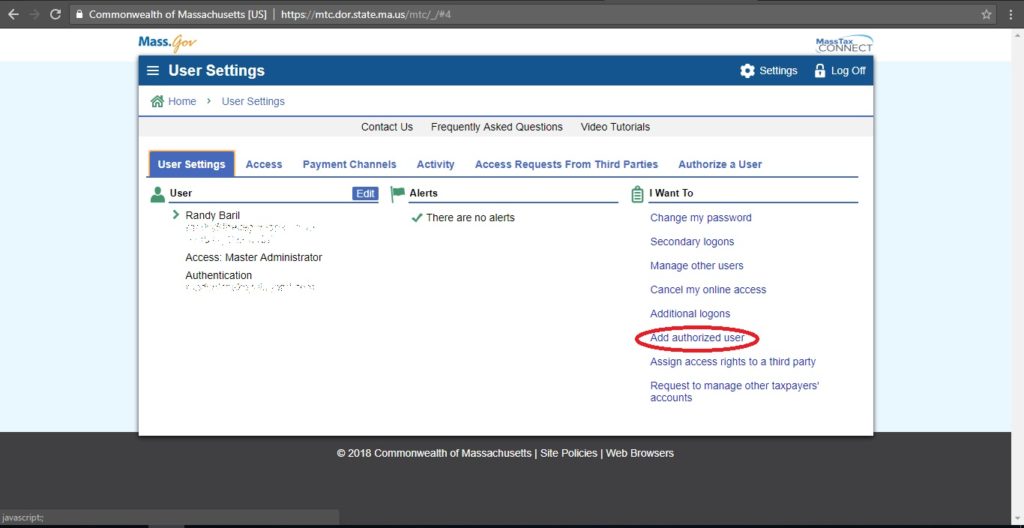
2. Select Add Authorized User on the right sidebar.

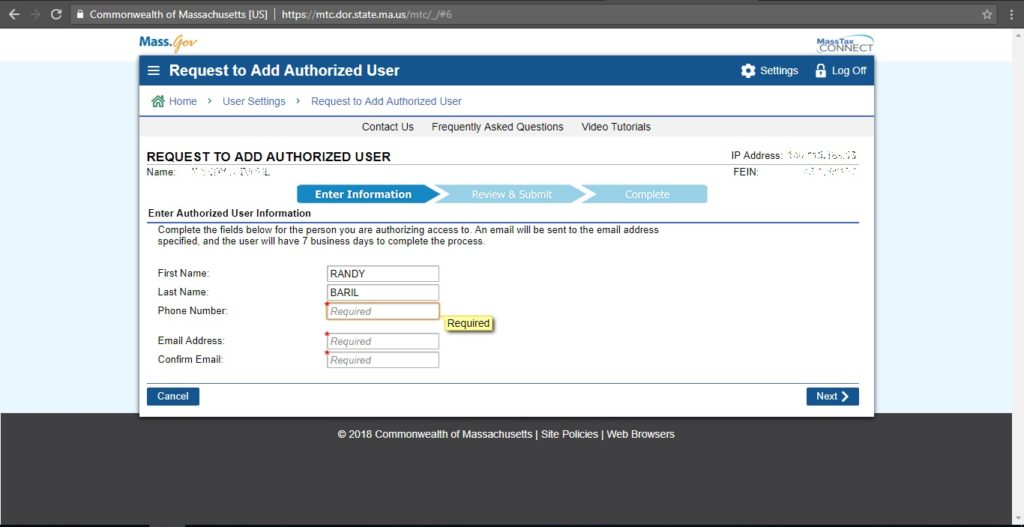
3. Enter their contact info, then select Next.

If you are entering information to make Draughts & Ledgers an Authorized User, please ask for a contact email specific to your company. To enhance security, each client gets assigned their own specific email to use in this kind of situation.

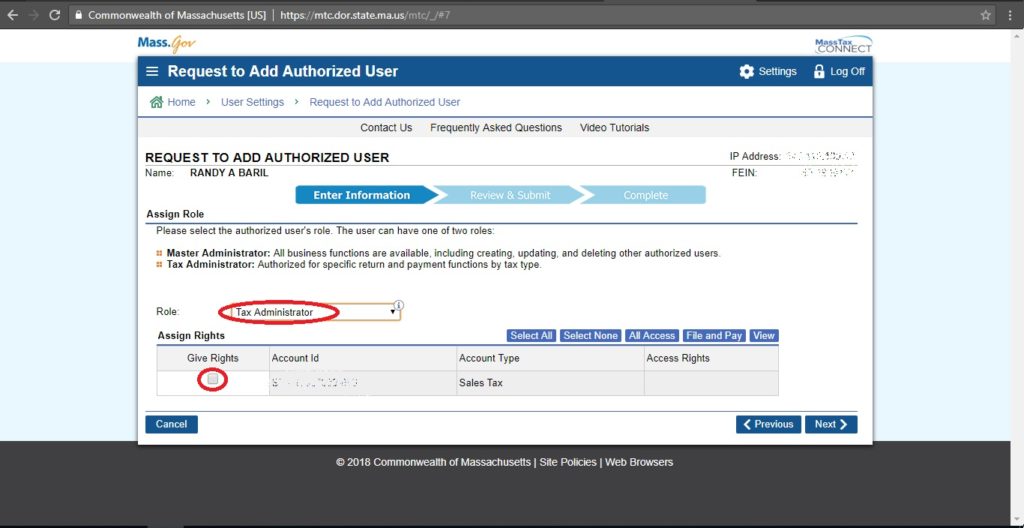
4. Select “Tax Administrator” from the dropdown and Give Rights to the appropriate Accounts once they populate. You’ll also have to grant specific Access Rights in the right-most box on each row. Once done for each Account, select Next.

View Only – Strictly for information gathering
Make Payments
– For submitting payments against already-entered filings.
File & Pay – For making filings, then scheduling payments.
All Access – Complete rights to filing amendments, closing accounts, and doing just about everything an Administrator does.

5. Review entered data and Submit.

The data will be submitted to the system and invitation / confirmation emails will be sent.

Congratulations! You’ve allowed access to highly-sensitive information in a secure and controlled manner.


Setting up Square to Sync with QuickBooks Online – Part 2

You use Square to power your Point of Sale and QuickBooks Online for your accounting. Getting them talking can save loads of time and allow your bookkeeper to focus on the more important aspects of your business. Square provides a handy and free (if not particularly powerful or well-reviewed) piece of software called Sync with Square that imports your POS data into QuickBooks Online on a daily basis. This article is to show you how to prepare your QuickBooks for Square’s data.

  1. Prepare Square for your bookkeeper.
  2. Get QuickBooks Online ready for linking your Square Item List
    • Set up Sales tax
    • Disable other integration methods
    • Connect the bank account to use with Sync with Square
    • Import your Square products and services into QuickBooks
  3. Using Sync with Square

The Intuit Quickbooks Sync With Square FAQ on Square contains a couple of broken links to the Switching to the Sync with Square app help page on QuickBooks Online’s Support Forum. The information hereafter is essentially a graphical representation of the latter. You are encouraged to read the original.

Set up Sales tax

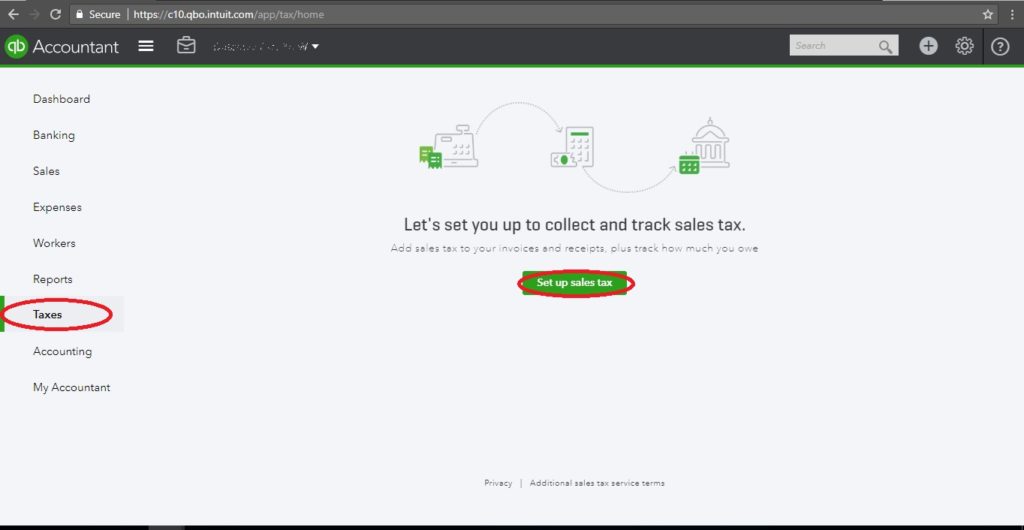
Select “Taxes” on the left, then “Set up Sales tax” if this is the first time you’ve clicked here before. You’ll quickly be walked through a couple of windows asking very basic questions to finish your setup.
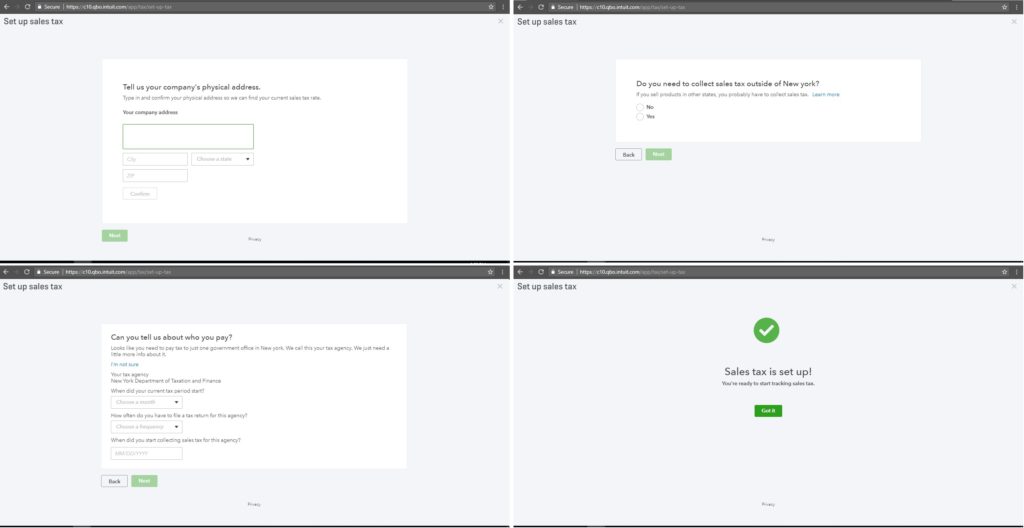
Or perhaps your window looks something closer to this:
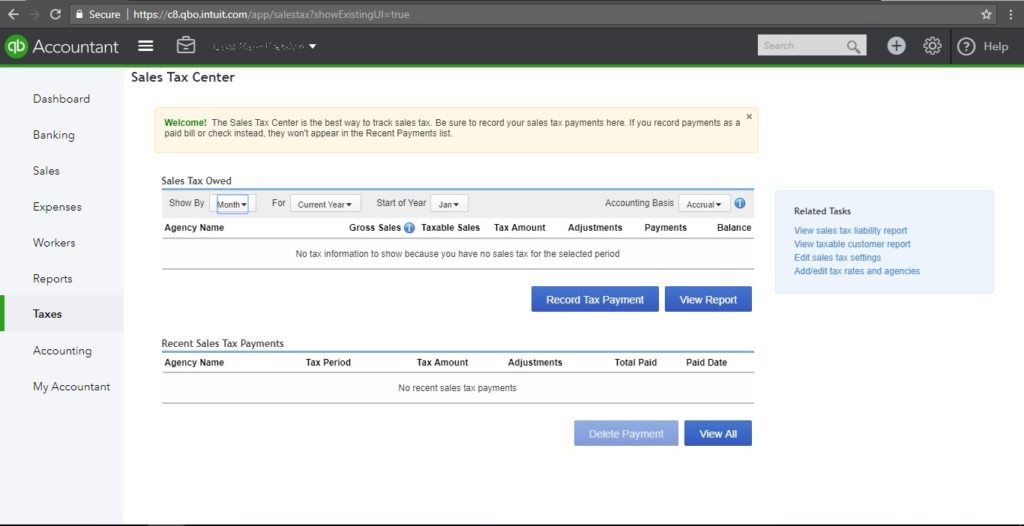
In this case, you’ll want to select “Add/edit tax rates and agencies” on the right first. When you click on “New” on the next screen, you should get a pop-up window like this. Simple or Combined tax rates depends on your location. In Massachusetts, there’s a single 6.25% state-wide sales tax and very few (if any) local add-ons. For Montgomery,  Alabama, there is a 4% state tax, a 2.5% Montgomery county tax, and a 3.5% Montgomery city tax collected as a
Combined 10% sales tax. You’ll have to investigate to set this up properly. Use your Square settings as a guide.

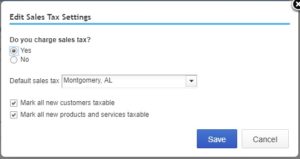
Once you have your tax rates and taxing authorities setup, you have to select “Edit Sales Tax Settings” to actually collect the tax. You’ll set the default sales tax and a couple other default settings as pictured to the left.

Disable other integration methods

If you’re collecting the Square data another way, turn if off. Duplicates will be a headache to identify and remove.

Connect the bank account to use with Sync with Square

Make sure that the bank account that is receiving your Square deposits appears in the Banking section. It does not need to have the bank feed setup or working so long as you have some way to import the data. Square will be staging the deposit transactions for you using this account.

Import your Square products and services into QuickBooks (optional)

If Square products or services are not specified in your QuickBooks, Sync with Square categorizes the item with the default name Square Item. You can set up how to categorize Square products and services on the Defaults for Unmatched Items page. It’s much easier to have things setup right from the start.

Square keys off of the item name so “Pulled Pork By Pond” will be different than “Pulled Pork By Pound”. Capitalization doesn’t seem to be that important. If an item name is changed on Square, QuickBooks will recognize it as a new item. Items can be merged after the fact.

Prepare Product Categories

Square uses categories so you may as well duplicate them in QuickBooks. From the Gear Icon (upper right), select “All Lists”, then “Product Categories”
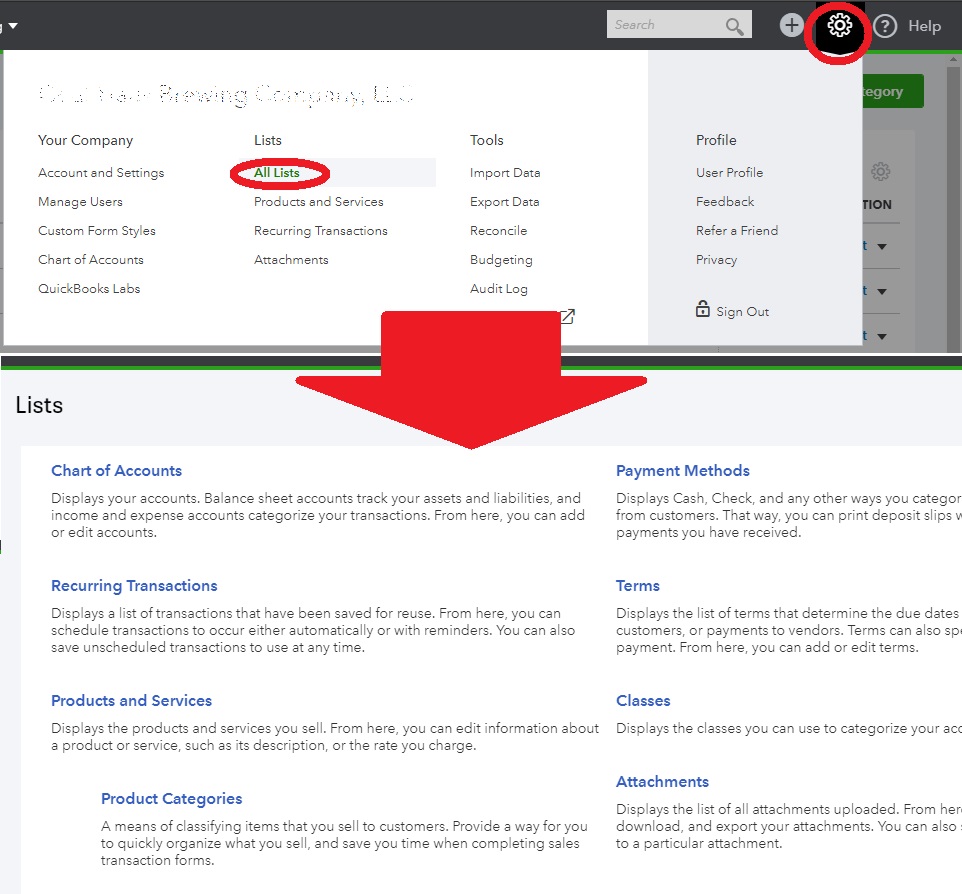
There is no Import mechanism for Product Categories so keep tapping the “New Category” button and entering them manually. This is not strictly necessary but will allow for easier reporting in QuickBooks without having to load Square.

Prepare Products and Services

Next, from the Gear Icon (upper right), select “All Lists”, then “Products and Services”. There is a fairly robust Import mechanism for these and we *ARE* going to use it, but first we’re going to manipulate the data a bit.

PROTIP: If you’re locked out of the Square Item list and cannot export it, run a sales report by item for the past 365 days. It’ll capture all the items you’d be importing. Be aware of duplicates (changed categories, for example) as this will cause errors in import.

In Square, on the Left pane, select “Items”, then the “Item Library” tab mid-screen, then click “Export” towards the right.
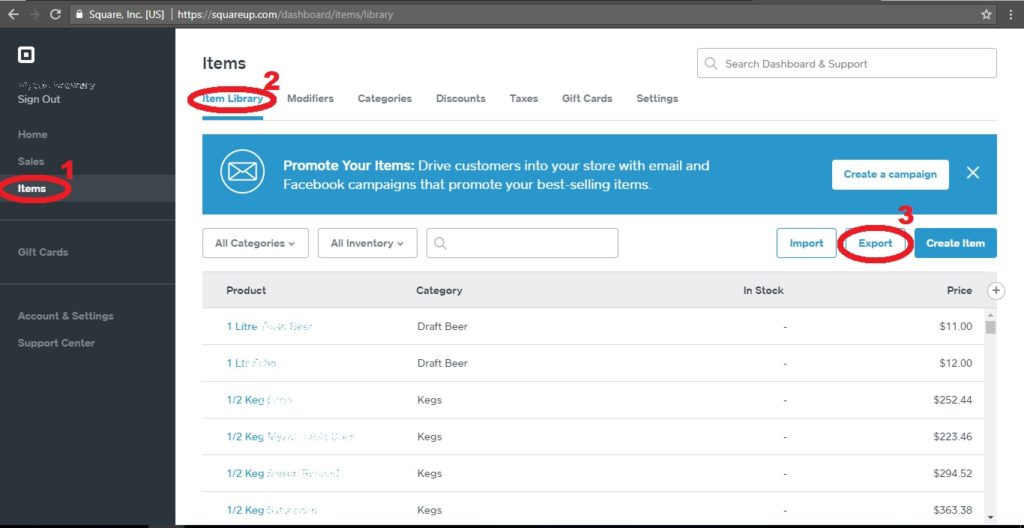
Export to Excel is recommended although .csv is more universal. If working with a .csv, the most important thing is to make sure that every cell is imported as TEXT, just the way it is. Many programs will try to tag certain things as dates or numbers, dropping leading zeros or changing date formatting. The Excel option preserves the proper formatting, even when importing to Google Sheets.

Before we start manipulating this data, let’s look at what the data needs to look like when we’re done. We can get this by exporting the sample file. Select “Sales” on the left, then the “Product and Services” tab, then click the  down arrow next to “New”, and finally “Import”
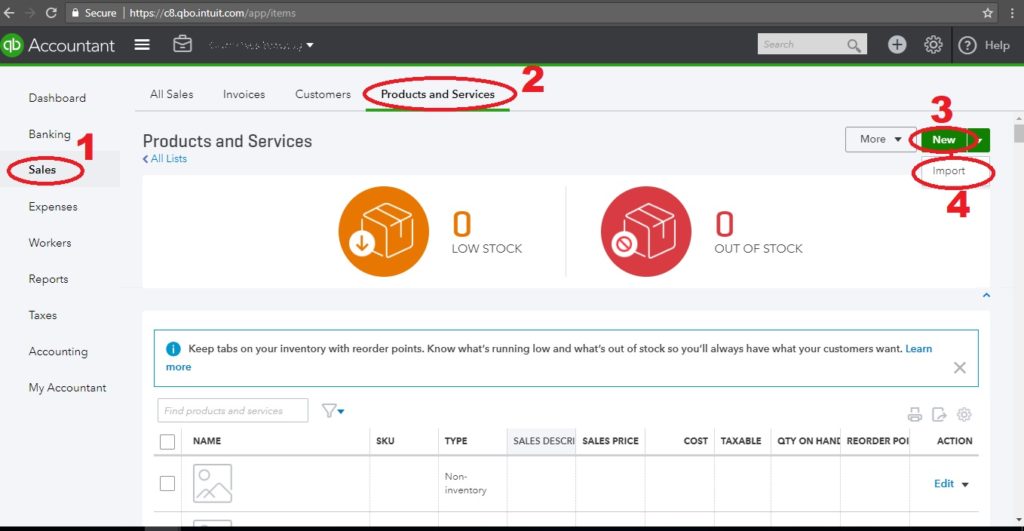
You’ll be back on this screen after we finish manipulating the data. For now, select “Download a sample file”. Below you can see the two files’ columns compared. On the top is the Square Item List export and on the bottom is QuickBooks sample file. Suggested mappings are included.

The five columns that should be filled in are Type, Income Account, Expense Account, Inventory Asset Account, and Quantity as-of Date. We encourage you to use Square to track inventory and let QuickBooks handle the accounting.

Type – We recommend using Non-inventory for physical things you sell and Service for non-physical things you sell.

Income Account – From your Chart of Accounts, this is where the money goes. Some CoA’s just use a single “Revenue”. Some brake it out to separate different kinds of income.

Expense Account – Doesn’t really matter unless you fill in the purchase cost. For each item you sell, you can record some cost for it. We recommend that setting this up only if you are tracking inventory in QuickBooks. Usually a COGS account.

Inventory Account – Doesn’t really matter unless you fill in the purchase cost. We recommend that setting this up only if you are tracking inventory in QuickBooks. Items purchased via Purchase Order or Expense accumulate inventory. Sales move this inventory to the expense account.

PROTIP: If you don’t have any item descriptions, copy the Category column here. It will make it much easier to sort your items into Categories later.

Once you finish manipulating your data, it’s back to the Item import screen (Select “Sales” on the left, then the “Product and Services” tab, then click the  down arrow next to “New”, and finally “Import”). From here, click “Browse” to select your file.

Once selected, click the green “Next” button in the bottom right. Most of the fields should map intuitively. Verify and hit the “Next” button again.
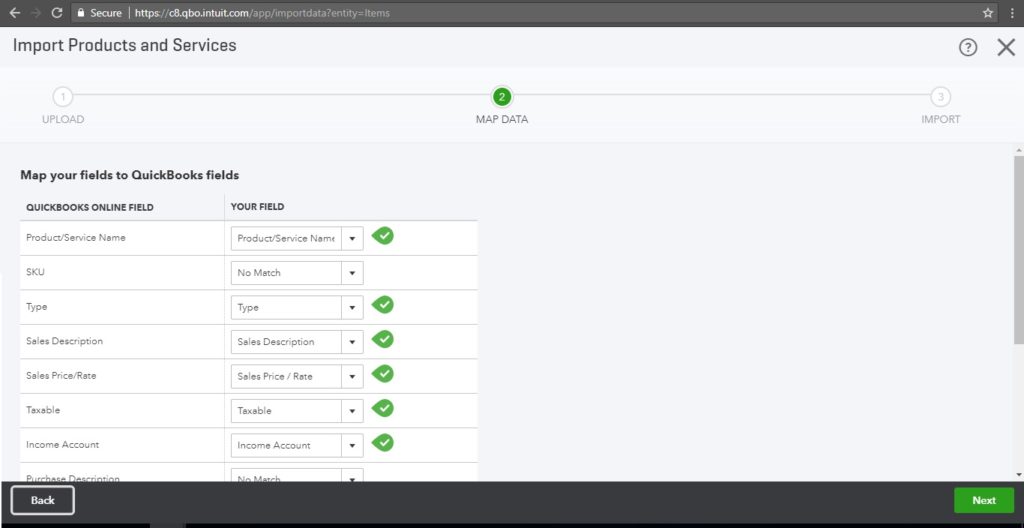
Next you’ll be asked to verify the items for import. Click “Import” on the lower right. If there are any errors, they’ll be one last screen asking you to make final changes. Once these are resolved, you’re done! Almost.

The final task is to sort your newly imported Items into the Categories you’ve setup. If you followed the PROTIP above, this is easy! If not, you’ll have to search and define them manually. Simply navigate to your Products and Services list (“Sales” on the left, then “Products and Services”), type the category name in the search box, select all (or some subset thereof), then assign the category using the drop-down “Assign category”.
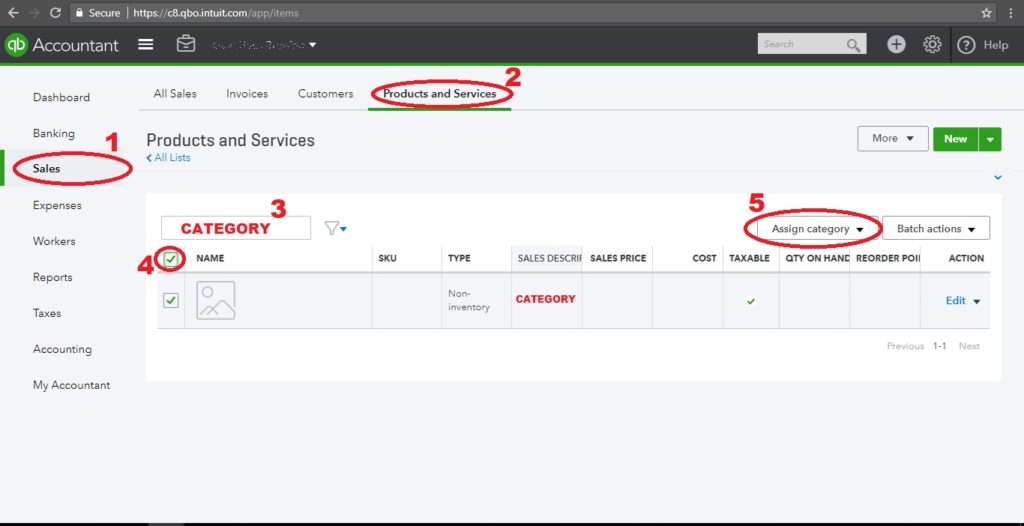
Fin!

Setting up Square to Sync with QuickBooks Online – Part 1

You use Square to power your Point of Sale and QuickBooks Online for your accounting. Getting them talking can save loads of time and allow your bookkeeper to focus on the more important aspects of your business. Square provides a handy and free (if not particularly powerful or well-reviewed) piece of software called Sync with Square that imports your POS data into QuickBooks Online on a daily basis. This article is to show you how to create an account for your bookkeeper with just enough access for them to get this done themselves.

  1. Prepare Square for your bookkeeper.
    • Create a Bookkeeper role.
    • Add your Bookkeeper as an Employee
  2. Get QuickBooks Online ready for linking your Square Item List
  3. Using Sync with Square

Create a Bookkeeper Role

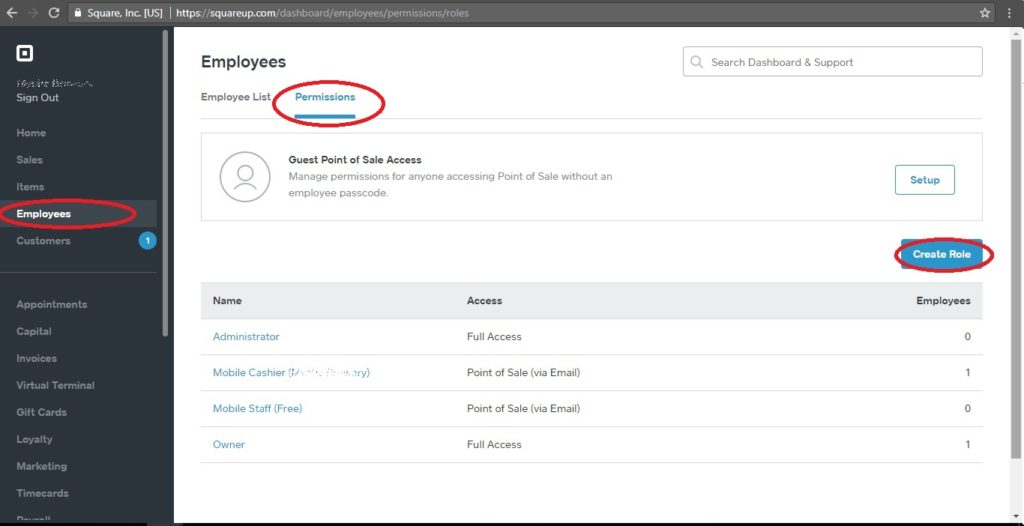
From your Admin Dashboard, select “Employees” on the left, navigate to the “Permissions” tab, then click on “Create Role”

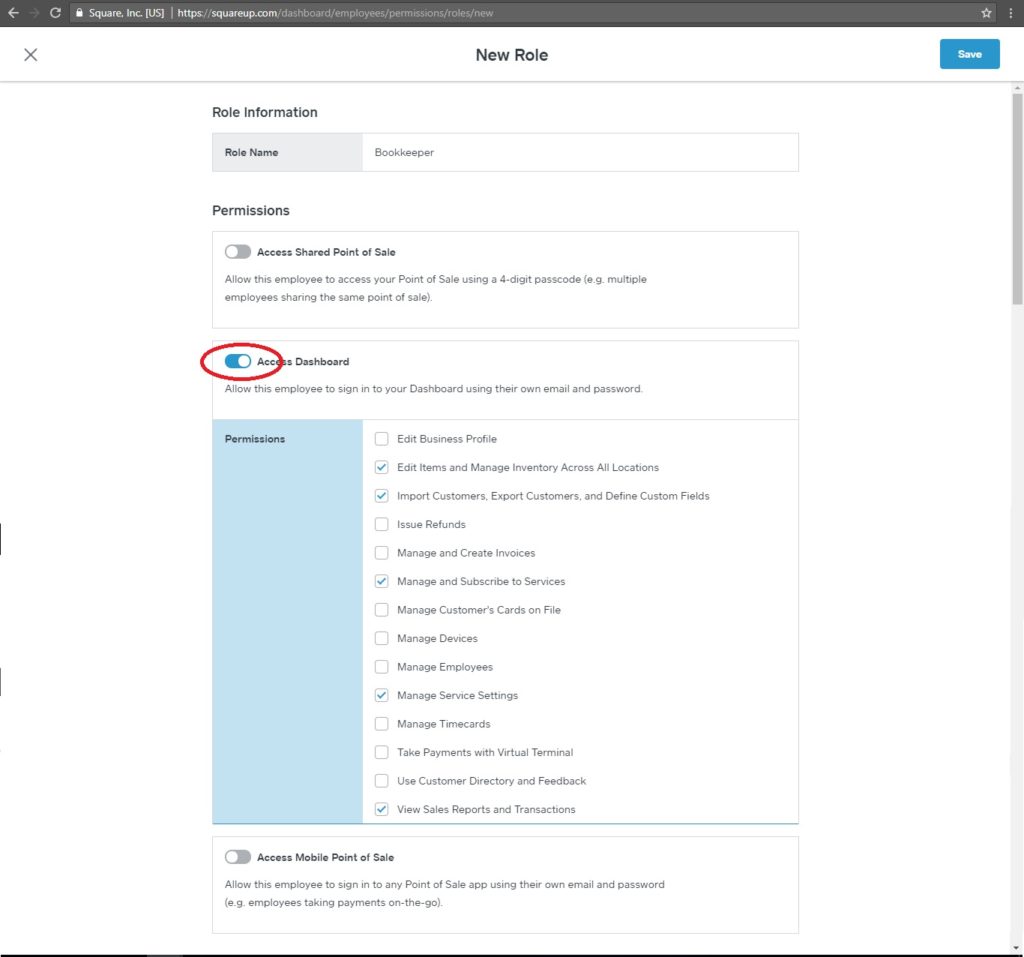
Name the Role “Bookkeeper” and allow for the following access:

OFF – Access Shares Point of Sale

ON – Access Dashboard

Check the following: “Edit Items and Manage Inventory Across All Locations”, “Import Customers, Export Customers, and Define Custom Fields”, “Manage and Subscribe to Services”, “Manage Service Settings”, “View Sales Reports and Transactions”

Leave the following unchecked: “Edit Business Profile”, “Issue Refunds”, “Manage and Create Invoices”, “Manage Customer’s Cards on File”, “Manage Devices”, “Manage Employees”, “Manage Timecards”, “Take Payments with Virtual Terminal”, “Use Customer Directory and Feedback”

OFF – Access Mobile Point of Sale

Then, hit “Save” in the top right.

Add your Bookkeeper as an Employee

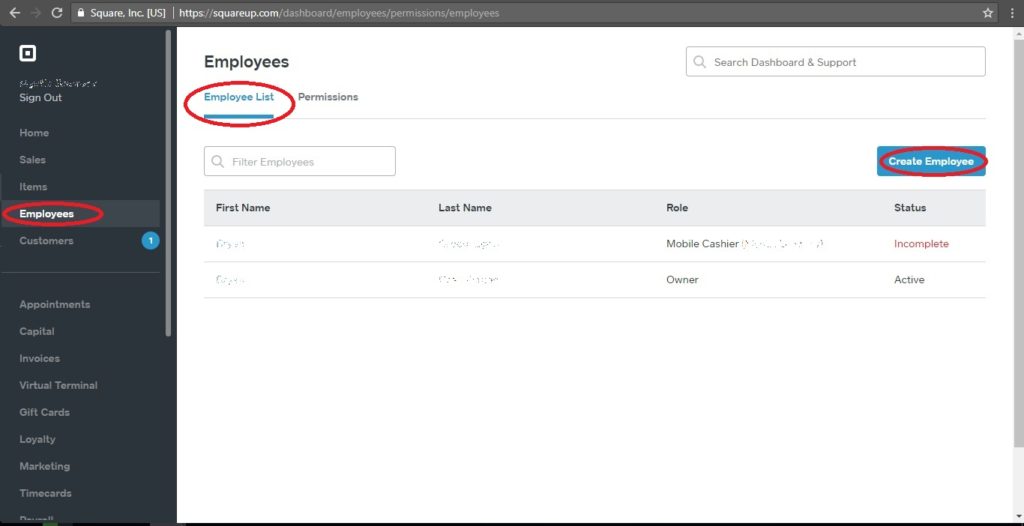
Again, from your Admin Dashboard, select “Employees” on the left, navigate to the “Employees List” tab, then click on “Create Role”

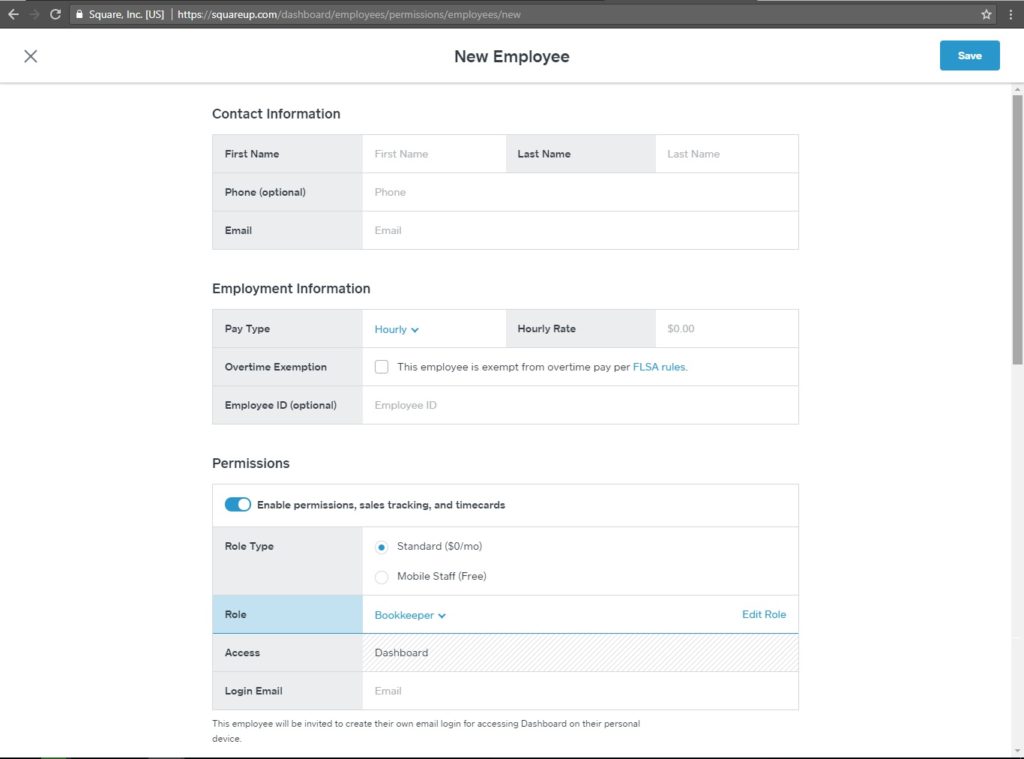
Enter the basic information about your bookeeper. “First Name”, “Last Name”, “Email”. Pay Type doesn’t matter so long as you select one (Hourly has fewer options to ignore).

ON – Enable permissions, sales tracking, and timecard

Role Type is “Standard ($0/mo)”

Role is “Bookkeeper”, which we created above.

Login Email is the same as Email.

Then, hit “Save” in the top right.

Congratulations! Your bookkeeper now has access to the basic information they need to continue with setup!

On to Part 2 – Get QuickBooks Online ready for linking your Square Item List

Pitfalls of Being an S-Corp in Massachusetts

Keep in mind that what you are about to read is based on personal experience, information we’ve gathered from the internet, tax books, and consultations with CPAs and tax attorneys. We are not a tax practice and this is not tax advice.

When setting up Draughts & Ledgers, Ltd, we decided to go the route of incorporating a domestic profit corporation here in Massachusetts, then electing for subchapter S treatment, which all means that we setup an S-Corp. Here are some of the additional steps that we discovered in our first year:

  1. Elect Subchapter S treatment. The whole point of forming a corporation was to create a distinct entity completely separate from you personally to protect your personal assets. Now, to simplify the accounting and tax filing, you need to inform the IRS that you wish this corporation to “pass-through” all profits to your personal tax return. This is what makes you an S-Corp. You need to fill out and send Form 2553, Election by a Small Business Corporation to the IRS.
  2. Register with your taxing authorities. There are quite a few that need to know what your company is up to in order to collect what is due. This is a bit more complex than for an LLC because being an S-Corp means that you are employed by your corporation. Congratulations on the new job! Make sure that you pay yourself a reasonable wage, which you can look up on the Department of Labor’s website. If you are a single-person S-Corp, we highly recommend buying and reading Quick and Dirty Payroll for One-person S Corps by Evergreen Small Business as it helps with the basic concepts we employ.
    • Federal Withholding Remittances: The Social Security and Medicare withholdings needs to be reported and remitted at least quarterly. You do this on Form 941, Employer’s Quarterly Federal Tax Return. While employees typically should also have income tax withheld, because the profits of your S-Corp are passing through to your personal tax return, you can keep them off of this form to stay under the $2,500 limit (this allows you to file quarterly instead of monthly) and instead make quarterly payments with Form 1040-ES, Estimated Tax for Individuals. We have found it advantageous to register with the EFTPS Electronic Federal Tax Payment System. Apparently while the remittance can be made electronically, the paper return must still be mailed in.
    • State Withholding Remittances: Since you are paying yourself wages, the State (Commonwealth, in our instance) also wants to know what you’re making and withholding. In Massachusetts, this is reported twice, once when calculating Unemployment Insurance liability (below) and once through MassTaxConnect, where it is remitted. As with the Federal Taxes, we prefer to skip the withholding, combine it with estimated taxes on the S-Corp, and file Form 1-ES – Massachusetts Estimated Income Tax Instructions and Worksheet for Individuals and 1-ES – Estimated Tax Payment Vouchers for Individuals instead. Even so, quarterly returns must be filed with MassTaxConnect or estimated withholding, fees, and penalties will be accessed.
    • State Unemployment: Being an employer means contributing to the State’s unemployment fund. This can be done quarterly. Register with the Division of Unemployment Assistance. Log in quarterly to enter your wages and have your contribution calculated. You cannot do this calculation yourself. If you’re curious, learn about employer contributions to DUA. The rates vary between 0.73% to 11.13%. As of this writing, newly subject employers in the non-construction industry pay a rate of 2.13%. These rates don’t include the 0.056% contribution rate for the Workforce Training Fund.
    • Federal Unemployment: When you registered with EFTPS, you also registered for this annual filing. You’re likely using Form 940, Employer’s Annual Federal Unemployment (FUTA) Tax Return.
    • State Sales/Meals Tax: Did you business sell taxable items or serve taxable food? If you did, you should have collected taxes from your customers and the state would like its money in a timely manner. If this applies to you, you’ll want to register this in your MassTaxConnect account.
    • State Corporate Excise Tax: This is another annual filing you’ve already registered for. This is an insanely complex document that ends up at the same answer for many S-Corps. It is filed through MassTaxConnect. If you want to see the paper return, it is Form 355S – S Corporation Excise Return (2017 – Draft). The tax rate for 2017 is $2.60 per $1,000 on taxable Massachusetts tangible property and a tax of 8.00% on income attributable to Massachusetts with a minimum excise of $456.
    • State Workers’ Compensation Insurance: If you or only Officers are employees of your corporation, you can opt out of this insurance by filing Form 153 – Affidavit of Exemption for Certain Corporate Officers.
    • Social Security Administration: Since you’re an employee of your corporation, you must file wage and withholding data with the SSA. There are services to do this and also 1099-Misc forms. If it’s just you and up to 49 employees, you can do this yourself for free with the Business Services Online. Be warned that this is an intimidating government website and there are a couple of tricky questions to be answered. Fortunately, all of the information can be pulled from the Form 941s you’ve been filing Quarterly. This is just a year-end summary to help your employees (you) file their personal income taxes.
  3. Post your required Notices. As silly as it sounds, if you were to get visited by an official, they may ask to see your Notices to Employees. You should have them printed and on-hand for such a request. We keep ours on a clipboard behind the computer monitor. Both the Commonwealth and the Federal Goverment have tools to help you figure out which ones you need. You can find them here:

    Keep in mind that not all posters are required. These two resources provide all necessary posters free of charge for printing on your own paper. There are services (and more than a couple scams) that may try to scare you into buying something you could get for free with just a little effort. For our operation, there were 9 posters, one of which isn’t really required because we file the Affidavit of Exemption from Workers’ Comp.

  4. Make your filings:
    • 31 January – State Excise Tax (MassTaxConnect)
    • 31 January – State UI (MA Division of Unemployment Insurance)
    • 31 January – State Withholding, Form M-941 for Q4 (MassTaxConnect)
    • 31 January – Federal UI, Form 940 (EFTPS)
    • 31 January – Federal Withholding, Form 941 for Q4 (EFTPS)
    • 31 January – 1099 Independent Contractors (if any) (IRS)
    • 31 January – W2 & W3 with Social Security Administration (SSA)
    • 15 March – State Excise Tax Return for an S Corporation, Form 355S (MassTaxConnect)
    • 15 March – U.S. Income Tax Return for an S Corporation, Form 1120S (IRS)
    • 30 April -State Excise Tax (MassTaxConnect)
    • 30 April – State UI (MA Division of Unemployment Insurance)
    • 30 April – State Withholding, Form M-941 for Q1 (MassTaxConnect)
    • 30 April – Federal Withholding, Form 941 for Q1 (EFTPS)
    • 31 July – State Excise Tax (MassTaxConnect)
    • 31 July – State UI (MA Division of Unemployment Insurance)
    • 31 July – State Withholding, Form M-941 for Q2 (MassTaxConnect)
    • 31 July – Federal Withholding, Form 941 for Q2 (EFTPS)
    • 31 October – State Excise Tax (MassTaxConnect)
    • 31 October – State UI (MA Division of Unemployment Insurance)
    • 31 October – State Withholding, Form M-941 for Q3 (MassTaxConnect)
    • 31 October – Federal Withholding, Form 941 for Q3 (EFTPS)
    • Annually – Affidavit of Exemption from Workers’ Comp (MA Department of Industrial Accidents)
    • Annually – Hold Shareholder’s Meeting and take Minutes
    • Annually – Annual Report (MA Secretary of Commonwealth)

Is it worth it? Of course, that depends on your particular circumstance. Let’s consider ours (Draughts & Ledgers, Ltd). I’m a bookkeeper living near Boston. Using the Department of Labor’s Bureau of Labor Statistics chart, the median income in my profession in my area is $46,890. I prefer round numbers, so let’s make it $48K instead. So each quarter I pay myself $12K. So each quarter, the following is due:

Federal Withholding (FICA, 15.3%, $1,488 SS + $348 Medicare) = $1,836
State Unemployment (2.13% + 0.056% of $12K) = $262

Then, annually, the following fees are also paid:

Federal Unemployment ($48K – $41K * .6%) = $42
State Corporation Annual Report ($100 online + $9 expedite fee) = $109
State Corporate Excise Tax = $456

So, ($1836+$262) * 4 + $42 + $109 + $456 = $8,999. At the same time, an LLC would cost $515 in filing fees. Sounds like a terrible deal, right?

The advantage of the S-Corp is not in paying yourself wages, but in taking distributions. These distributions are considered unearned, passive income and are not subject to self-employment income. Since FICA taxes were paid throughout the year on the earned $48,000, there are no additional self-employment taxes assessed on the 1040. For the LLC, ALL of the business profits are subject to self-employment taxes (15.3%). So, given the difference in filing fees, unemployment contributions, and everything else, how much in distributions must I have to breakeven on going the S-Corp route over the LLC route?

** CALCULATION PENDING **

Forming a Corporation in Massachusetts

Forming a Corporation in Massachusetts

In the Commonwealth of Massachusetts, it makes more sense to form a corporation than an LLC as the formation and annual filing fees are both lower. There is the added headache of having to submit certain annual filings, but these can be rather generic. As of this writing, the filing fee for a corporation is $250 while an LLC is $500. Both are subject to a $15 expedition fee regardless of payment method. Annually, a corporation must submit the annual report, which is $100 if filed online in a timely manner. An LLC has no annual reporting requirement but still requires an annual payment of $500.

Before we begin, I should be ABSOLUTELY CLEAR that I am not now, nor have I ever been, a lawyer. What follows is NOT TO BE CONSTRUED AS LEGAL ADVICE. I am sharing with you various resources and files that I found and/or made while incorporating Draughts & Ledgers, Ltd. Feel free to use these resources to generate official-looking documents, but PLEASE, get them checked out by a lawyer before taking any action on or with them.

These steps were taken following steps outlined on the Digital Media Law Project page on Forming a Corporation in Massachusetts. I have modified them as I followed the process and added supporting documents.

  1. Choose a business name for the corporation and check for availability. Your imagination is the limit! That, and checking that no other entities are using this or a substantially similar name. This can be done for free on the Secretary of State’s website. There are rules around what can and cannot be a legal name.
  2. Recruit and/or appoint a director or directors for the corporation. This can be yourself in all positions.
  3. Appoint a Registered Agent. This could be yourself, but could carry significant penalties or fees if any (legal) process was unable to be served during regular business hours at your designated business address. If your office is ever closed or vacant, it’s easier to appoint someone else to “always be home”. I have found that the most cost-effective is Registered Agent for Massachusetts at $49/year.
  4. File Articles of Incorporation with the State. You can do this yourself on the Secretary of State’s website. Most likely, you are a Domestic Profit Corporation. I suggest authorizing 275,000 shares of undesignated stock as this is the maximum allowable without additional fee. You don’t have to issue all of them or set a par value. I specified in Article V that the Bylaws would dictate limitations of stock transfer and added an extra indemnification clause in Article VI.Be sure to specify the Registered Agent you engaged in the appropriate spots. At a minimum, you must have a President, Secretary, and Treasurer as well as as a Director. You can serve in all of these positions.
  5. Create the corporation’s bylaws. These are not filed with the state but must be present at the designated address for your corporate documents. If you specified your Registered Agent, you’ll need to provide them with a copy. Once again, DMLP provides a great overview of these documents  here. Here’s a handy fillable .PDF from Northwest Registered Agent.
  6. You’ll be presenting a variety of other organizational documents at the first Shareholder’s meeting.
    • Resolutions of Incorporator. In which you adopt your Articles of Incorporation and Bylaws, then promptly resign. Here’s some language from upcouncel.com.
    • Bill of Sale of Issued Stock. Good to have on hand. Info from Northwest Registered Agent here.
    • Minutes of the First Meeting of the [Sole / Board of] Director(s). Here’s a handy fillable .PDF from Northwest Registered Agent for multiple Directors. And another for a Sole Director.
    • Stock Certificates for issuance. Just Google “.pdf fillable stock certificate” or use this one from Northwest Registered Agent.
    • The Corporate Record Book. This could be a physical book or online. Here’s a description of what this document does.
  7. Hold the First Shareholder’s meeting. Again, not filed with the state but must be on hand at the designated address for your corporate documents. You must record in minutes the initial organizational meeting to (1) appoint directors; (2) appoint corporate officers; (3) adopt the bylaws; (4) authorize the issuance of stock; (5) set the corporation’s accounting year (fiscal year); (6) adopt a stock certificate form; (7) designate a bank; and (8) select a corporate seal (optional but cool). Again, DMLP. Here’s a handy fillable .PDF from Northwest Registered Agent that can also serve as the minutes.
  8. Get an EIN from the IRS or you’re SOL. Since a corporation is a unique entity, you’ll need a distinct identifying number whenever you are dealing with tax-related matters. You CANNOT use your social security number. Get an EIN instantly, online, for free, directly from the IRS, here.
  9. File with your Local Authorities. This could be a business certificate or similarly named document that states that your corporation has registered in the local jurisdiction where it operates. Counter-intuitively, you need the Federal EIN first, which you can only get once you’ve incorporated with the State. This may only be necessary if your trade name (We Count Your Money) is significantly different from your business name (Draughts & Ledgers, Ltd). Since we operate with our business name, this filing was unnecessary.
  10. Open a Bank Account for your Corporation. Keeping your personal and business finances separate isn’t just a good idea, its fiduciary! Most banks will ask to see your Articles of Incorporation, your Bylaws, the minutes of the meeting establishing you as an authorized Officer of the corporation, your personal identification, the Resolution authorizing the corporation to open the bank account at their bank, the corporation’s EIN, and the local business license. In our case, our local bank recognized us as a regular customer and just needed the Articles and the EIN.
  11. Profit!

Congratulations! You’ve successfully started your own corporation! Just remember that even if you’re the sole Director and Officer of a corporation that you operate for your own business, you still need to make annual filings of the activities of your corporation. The main two are the annual Shareholder’s Meeting and the Board of Directors. You can find draft language once again from Northwest Registered Agent for the Shareholders and the Board. There are also draft Resolution forms further down on this summary page. Not useful if you’re the be-all, end-all of your corporation, but may be necessary as you grow.

Cheers!

You Make Beer – That’s Domestic Production

You Make Beer – That’s Domestic Production

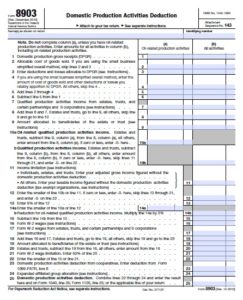
The federal tax code incentivizes businesses to produce goods domestically instead of off-shoring that production. And making beer is actually producing beer. Your fundamental business activity qualifies you for what is called a Section 199 Domestic Production Activities Deduction.

Claimed on Form 8903, it is calculated based on what is called production activities net income. This is essentially all of the revenue generated by selling beer (directly in a taproom or via wholesale accounts) minus the direct and attributable costs of producing & selling the beer sold. Multiply this number by 9% and score a well-deserved deduction directly from your tax liability!

Keep in mind that side businesses such as selling prepared foods or merchandise are not production activities and must be excluded. Similarly, the labor and associated overhead devoted to these activities must also be excluded. Fortunately, smaller businesses generating less than $5 million dollars in gross revenue can use a simplified equation to proportionally allocate these expenses.

One more thing to keep in mind is that this deduction is capped at 9% of 50% of W2 wages. So, if you do it all with a very small crew or rely on fellow stakeholders, you may find this deduction capped. There is a way to make the compensation of stakeholders (partners or S-corp members) equivalent to W2 income using a portion of W2 wages reported on a K1. You’d need to consult with your tax preparer for the specifics. Still, it’s pretty unlikely you’d run into this cap unless you have an unfathomably profitable operation. Consider that if your production activity net income is $100,000. 9% of this is $9,000. So, if you paid a part-time employee $18,000 in that year, you’ve satisfied this cap.

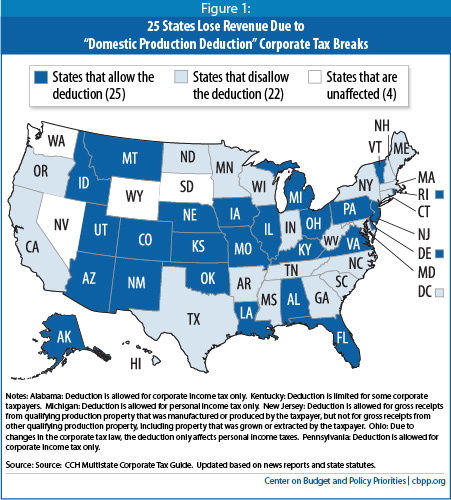
Tax analysts estimate that this deduction is equivalent to a 3% gross reduction in taxes for qualifying businesses. While it helps at the federal level, many states have found that they are actually losers in allowing this deduction at the state level (due to it being applicable across state lines), so a number of states, including New York, Connecticut, Massachusetts, New Hampshire, and Maine disallow it when filing your state taxes. Just one more thing for your tax preparer to keep track of!

Keeping track of and categorizing the information that informs the production activities net income is something that a quality bookkeeper like Draughts & Ledgers do as part of the basic level of service provided! If we can’t kill your taxable income with Section 179, we’ll help keep it as low as possible so that you can continue to invest in the brewery you’ve always dreamed of!